Wednesday, 30 December 2015

Poster Progression 4 - Final Decisions


1

2

3

4

5

6

7

8

9

10


1) In accordance with my thoughts on my concept, I began with the original image placing the logo in the same place. I decided that the logo was in a great place and that the images colours complimented the logo.

2) In fear that the logo wasn't distinct enough from the background, I added this brownish boarder to give the logo more texture and to make it more visible by having more depth.

3) As I was happy with the logo, I decided that the next step would be adding my actors names. In order to be in-keeping with my logo, I thought that the first letters of their names should be larger and more dominant than the other letters. I also felt that I should try and arrange the words together, like my logo, to show that the layout has been chosen and is well thought out.

4) After leaving the poster for a session or two, I realised that I didn't think the layout of the actors names was as visually pleasing as it could be. More importantly, my films protagonist (Jodi Taylor) was not the first name – and it should be. Therefore, I moved Jodi's name to the top of the triangle to make an implied sense of hierarchy.

5) It then became obvious to me that the actors names were perhaps not readable enough when placed ontop of the background. Therefore, I used photoshops text feature to give the names more texture and depth, by using the Texture and Contour tabs.

6) I found that this made the words more complex which made the poster feel more professional and conventional. However, this still wasn't enough to make the words readable as I know realised that the bright background was the real problem.

7) Therefore, I cut-out my two actors with the lasso tool, to make sure they still remained bright, added a black rectangle between the layers and used the opacity tool to make it darker. Instantly, I felt the poster looked more intricate and striking. Yet, I now felt that actually the background could be darker and the actors names were still not right.

8) So, I made the background even darker to give the poster a moody feel which, overall, felt more dramatic. I also swapped over the lower two actors names as I felt this was more aesthetically pleasing as 'Jodi Taylor' seemed to fit perfectly in the gap, now. But I knew it still wasn't right.

9) I realised that the background was perhaps too dark and was compromising the visibility of the actual background, so I put opacity in the middle of the last two settings (this being about 60%). Because of this, though, I now realised that my actors were not the right shade due to a lot of white light so I used the 'Burn' tool to make their image more yellow and vintage-y. I felt that this worked incredibly well because it felt like, to me, the actors fitted more successfully into their background. Also, whilst reconsidering my aim of minimalism, I experimented with the idea of having smaller actor names – which I felt worked because it made the poster feel more exclusive and subtle. I also added in the small print at the bottom and I will discuss these more in my next point.

10) After being happy with everything else within my poster, I gave the small print at the bottom some attention. I followed the usual layout to be conventional, which involves making the names of people larger - whilst keeping their titles smaller. As this is such a large poster image, I realised that there was not enough credits to fill the whole of the poster so I, instead, went for a smaller central alignment to make the text on the poster seem spread out and seamless. I also lowered in than in my earlier draft because I felt that lower down it was less intrusive and demanding.  

Tuesday, 29 December 2015

Poster Progression 3 - Image and Concept


After much thinking, I decided that having everything on my poster black and white was slightly boring and uneventful. Therefore, I thought that maybe having my background as only black and white would make my actors stand out as well as the words. The image above is one of the drafts that I made. I felt that the concept worked. However, I thought that to stay conventional that I should play around with having my background not black and white but just darker than the subjects, logo and text.  

Poster Progression 2 - Poster Mock Ups

12

34


56


To start off with, my concept was to have black and white poster image with my strong gold logo as the centre piece. Here are my thoughts on the different images and how they work as a poster:

1) I think this image is very striking and strong of my films protagonist. However, I felt like like this draft fails in two ways. 1) Most of the strongest posters I have seen are landscape and I believe that the image I use should be landscape. 2) Even though a lone female has strong suggestions of narrative, I think that the image I use should have her lover in, in order to get a potential viewer interested in the dynamic within the photograph.

2) I am a lover of this photograph and this mock up because I think there is a great sense of character relations and chemistry. Also, this frame feels conventional as it is a silhouetted 2 shot which feels incredibly romantic and intimate. However, I personally feel that there is not enough space for the logo without it feeling intrusive or entering into the space of the subject of the picture. I also felt that the horizontal twig on the left-hand-side interrupted the muted background.

3) This image is very usable due to the effectively of the actors face, staring into her eyes. The background is also dramatic yet not too distracting due to all the trees being relatively faraway. There is also enough room for the text that the poster will include such as, the already evident, logo, actors names, ect. However, the only problem with this image is a very big one – the viewer cannot see Jodi's face. Bearing in mind that the purpose of a poster is to entice an audience viewer, I doubt that an image that doesn't show the stories protagonist properly is a usable one.

4) In similarity to image 3, there are many things right with this draft poster. I like the amount of space that the image has, as it makes the logo more prominent whilst still allowing focus on the actors. The silhouetted 2 shot is also effective because of the potential passion and drama within their facial expressions. However, this image is incredibly dark and this is contrasted with the incredibly white sunlight section in the top right corner of the poster which makes it feel less professional and clear than the other options.

5) I, personally, think that this is one of the best poses within the possible images. I think that the look Jodie (Charlotte) is giving Max (James) has a great sense of character relations which sparks a lookers imagination as to why she is looking at him in such a way. However, I then had to ask myself: Is this pose in-keeping with my actual narrative? In short, I decided it did not because in the film James relies on Charlotte but this picture implies the opposite. Also I felt the tones of the background was too infrequent and patchy which, once again, distracted from from the subjects of the image.

6) Eventually, I decided that this mock-up and image was the best for these reasons:

- The pose was very effective. It gives the potential audience viewer a direct look at the stories protagonists face and several things to think about. Such as, why does the female look so serious and thoughtful? Why isn't she looking up and her lover and seemingly ignoring him? Why is he only slightly touching her? Why are they in a woods? And it is questions like this that bring in viewers.

- There is a lot of negative space to use that is strong yet not distracting from the two actors. This is because there is one main tree and many leaves on the floor which means that is is rather simplistic and minimal.

- The logo fits into the sections allotted with space to spare which means that it fits in naturally whilst not feeling intrusive.

- There is a lot of space to play around with the actors, directors and producers names next to the actors.  

Poster Progression 1 - Core Poster Images

Single Protagonist Photos


The Profiled Two Shot


The Final-Third Two Shot


These are the best images I took on my shoot day and will be used for my poster or double page spread. I ended up choosing the top 6 to do some draft posters with (which are explored on the next post). All of these images were taken with the poster and double page spread in mind hence why there are sections of negative space.

In general, though, I have decided that my poster will be minimal and will be in-keeping with my logos gold typography.  

Friday, 13 November 2015

Logo Progressions

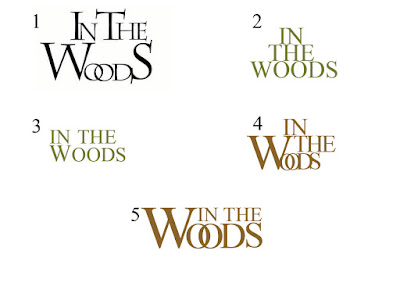
1) This was my first attempt at my films logo. I am aware of the conventions of Period Drama logos, I was aware the font that I used must be moderate and classical. Times New Roman is certainly, in my opinion, a clear and concise choice. To start simply, I used black and began to arrange the words. After some arranging, I thought it would look most effective if I made certain letters bigger than others. The two O’s crossing over was an accident to begin with however I quite like this and think it may help me create a brandy and reinforce brand synergy.

Things that didn’t work in this logo:
  • The letters weren’t orderly enough and the logo looked too playful and my short film isn’t playful as it is a drama.
  • The letters are not well aligned
  • The letters are not centrally aligned
  • Black is a flat colour


2) In order to improve, I focused on the colours and alignment my second logo. As my film is set outside, I felt green may be a good choice. I also tried not crossing over the O’s, to see how it looked, and kept all the letters the same size to also experiment.

Things that didn’t work in this logo:
  • Not having larger capitalized letters
  • The logo is too parallel and progresses too dramatically in size due to the different lengths of the words.
  • Not having the O’s crossing has less character and although the period drama is about uniform logos, they still need to have something different and defining.


3) To address the issues raised by the second logo, I arranged the first two woods to be above ‘WOODS’ and made the ‘W’ slightly bigger than the rest of the logo.

Things that didn’t work in this logo:
  • The W still wasn’t big enough
  • The colour isn’t opulent enough and feels slightly flat
  • The letters still don’t align with one another


4) I chose gold as the leading colour of the logo as it is dominant and slightly regal. Also, many Period Dramas use golds and yellows as it is relevant to the time. In continuation with the thoughts on the size of the ‘W’, I decided to make it almost double the size of the other text. I also felt that the crossed over O’s are important for brand identity and synergy therefore I decided to bring them back.

Things that didn’t work in this logo:
  • I liked the uniform nature of option 3 however it lacked character. This option, then, had too much character and wasn’t uniform enough due to the mish-mash layout of the words.
  • ‘IN THE’ is too large in comparison to ‘OODS’ which isn’t good as the first two words have less importance.


5) To amend the earlier issues, I:
  • Resized the letters to make the word ‘Woods’ more dominant and eye catching.
  • Aligned the letters to ensure they fitted into a slightly rectangular style which works well on the eye but also in terms of posters and double page spreads as it will fit into layouts well. 


This is my final logo: 

Brand Synergy: 

In retrospective with all of the above, I have decided that my brand will be orientated around this typography and gold. This means that almost all text surrounding my film should be in this colour and close to this font. Also, the other colours surrounding my film should be browns and greens to evoke rural imagery and nature. In order to create a successful film and brand, I MUST stick to these rules and codes to have brand cohesion. 

Monday, 9 November 2015

Filming Day


Here is a selection of photos from our first shot day which was mainly the filming of the later part of Scene 2 (referred to as Scene 2b in my shot lists).


I kept to the shot list quite rigidly to ensure I had the footage necessary. Once I had got the shot I felt I needed I would cross it out. My shot list looked a bit like this half way through my shoot: 


Wednesday, 21 October 2015

Shot Lists


These are my shot lists for my 3 shoot days. I decided to film Scene 2 in two sections in order to avoid continuity issues and confusion.  

Wednesday, 7 October 2015

Shot Preparations - Scene 1


In order to ensure that my footage is at its best quality, I went to my intended locations to take images to see if the area was what I wanted it to be and that it translated well on the camera. Here are some of the shots that I took: 


These three raw images were taken from where I intended to place my camera during the picnic scene. As I intended for the shot to be relatively long and beautiful, I feel that this spot was incredibly effective as the background as it was beautiful yet not too over-powering. Importantly, I kept the camera at the same spot for a while whilst the weather changed. This meant that I saw the shot from several different lights and shades. I was happy with each shot individually which meant that, no matter the weather, I could shoot here and always have successful shots.


I also knew that, since this was the first scene of my film, that I needed to film a successful number of establishing long shots. By simply moving around my intended filming area, I was very aware that this space allowed the perfect platform for captivating establishing shots because you could not see signs of modern life (such as telephone poles and football goals) and the shots had resting movement like birds flying and water moving. This type of movement made me think that I could use such shots to show my films titles and to set the film subtly and successfully. 


These photos are just more examples of my experimentation of cinematography within my location. I was sold after spending about an hour here and looking at multiple perspectives because every image I took was interesting yet not too dominant – which means that the drama of my short film would layer beautifully with such landscapes. 


Tuesday, 6 October 2015

Call Sheet


This is the template I created for my call sheet to give my actors. I filled out the details and necessary information by hand. 

As well as this, I also made sure that my actors remembered by contacting them by text or, more regularly, by Facebook Messenger - to discuss things like outfits and times.

Here is an example: 

Tuesday, 29 September 2015

3 Double Page Spread Drafts

1


2

3


Many film magazines follow the same format as any other type of magazine with tendencies like Headlines, stand firsts and drop caps. Therefore, I decided to use the knowledge I developed last year when making a music magazine to inform my drafting process.

Option 1 is possibly my favourite as it involves having the whole background as an image which is a very immersive way to present a review. It is also fitting with my genre which is occasionally decadent whilst being immersive and beautiful. Therefore, if when shooting on location I take a strong image of my cast this kind of layout lends itself to such imagery.

Option 2 is perhaps more conventional for a film review because of the layout and the spacing. It also has two images from the film instead of one which means a potential audience member can see more of the work and thus is more likely to be attracted to seeing it. There is also more room for text within this layout which means more content can be placed on the page and, usually, the more information about a film the better. The room for pull quotes and larger sections of texts are also a good way to grab a glancing reader’s attention if an interesting statement is placed.

Option 3 feels more basic than the other layouts but this is not necessarily a bad thing. This is a good possible layout as it is clear and to the point. It equally allows the reader to be attracted by an image as it does to be attracted by a pull quote or interesting headline. 

3 Film Poster Drafts


1


2


3


After studying other film posters of my genre, I was inspired that my poster should be in a rural setting as my entire short film is set outside. I will also have my actors in the clothes used in filming due to continuity reasons. It is most likely that I will shoot the image used on my poster on location alongside my film to make sure they look the same but also to ensure the backgrounds are the same.

All drafts, in my opinion, will be equally as fitting for my genre and short film as the other. However, I particularly like the layout of Option 1 as I feel it conveys the dynamics of my characters relations very well and would entice a possible audience member to find out more. I also like Option 1 because, if well edited, it will be aesthetically pleasing with bright dark browns and greens to contrast my actors clothing

Option 2 would be equally as aesthetically pleasing due to the use of dramatic silhouettes and nature surrounding them. Also, as they are all walking in the same direction, there is a sense of mystery and wonder as to where they are going. If I do go with this layout, I will ensure that my female protagonist is leading the men to show that she is the leader and cause of the drama within the piece.


Option 3 is possibly my least favourite as it seems, to me, as if the characters are too static and separate. Bearing in mind that the period drama is about deep character relations, this kind of poster feels false and too far away from my genre’s tendencies.